TABLE OF CONTENTS
Overview
Apache Tomcat is an open-source web server software for Java programming developed and maintained by the Apache Software Foundation. It hosts and deploys Java servlets (server-side Java code) that manage HTTP (HyperText Transfer Protocol) requests from client applications. This guide explains how to integrate Apache Tomcat logs with ADR (Artificial Intelligence Security Information and Event Management) using NxLog (Network Extended Log) for comprehensive visibility and proactive threat detection.
Network Prerequisites: Ensure firewall allows ports 514 and 5154 from the Windows server to CCE (Collection and Control Engine).
Steps of Configuration
Download NxLog Community Addition
NxLog processes collected information and forwards it to the OTM (Operational Threat Management) CCE.
Step 1: Login to collector/AD (Active Directory) computer
Step 2: Download the latest NxLog version
Use the Windows MSI (Microsoft Software Installer) file with installer
Download from: http://nxlog.org/products/nxlog-community-edition/download
Replace NxLog Conf file
Step 1: Open the NxLog configuration file at:
C:\Program Files (x86)\nxlog\conf\nxlog.confStep 2: Replace the entire configuration file with the following content:
Note: Replace the variable (IP Address of ADR Collector) with the actual ADR Server IP (Internet Protocol) address:
## This is a sample configuration file. See the nxlog reference manual about the
## Please set the ROOT to the folder your nxlog was installed into, ##otherwise it will not start.

define ROOT C:\Program Files\nxlog
##define ROOT C:\Program Files (x86)\nxlog

Moduledir %ROOT%\modules
CacheDir %ROOT%\data
Pidfile %ROOT%\data\nxlog.pid
SpoolDir %ROOT%\data
LogFile %ROOT%\data\nxlog.log

<Extension _json>
  Module xm_json
</Extension>

 <Extension syslog>
	Module xm_syslog
</Extension>

define aisiem \
1, 3, 4, 5, 6, 7, 8, 9, 10, 12, 13, 14, 15, 17, 18, 19, 20, 21, 104, 258, 259, 260, \
261, 262, 500, 517, 520, 528, 529, 530, 531, 532, 533, 534, 535, 536, 537, 538, 539,\
540, 551, 552, 565, 600, 608, 609, 621, 622, 626, 627, 628, 629, 630, 636, 642, 644,\
645, 647, 632, 663, 664, 671, 673, 675, 676, 677, 679, 680, 681, 682, 683, 684, 689,\
690, 692, 1001, 1006, 1007, 1008, 1015, 1102, 1116, 1117, 1118, 1119, 2003, 2100, \
7034, 4624, 4625, 4634, 4647, 4649, 4656, 4657, 4659, 4661, 4663, 4670, 4688, 4697, \
4704, 4705, 4717, 4718, 4720, 4722, 4723, 4724, 4725, 4726, 4727, 4728, 4729, 4730, \
4731, 4732, 4733, 4734, 4735, 4737, 4738, 4739, 4740, 4741, 4742, 4743, 4744, 4745, \
4746, 4747, 4748, 4749, 4750, 4751, 4752, 4753, 4754, 4755, 4756, 4757, 4758, 4759, \
4760, 4761, 4762, 4763, 4764, 4767, 4769, 4771, 4772, 4773, 4775, 4776, 4777, 4778, \
4779, 4780, 4782, 4783, 4784, 4785, 4786, 4787, 4788, 4789, 4790, 4791, 4793, 4794, \
4797, 4798, 4800, 4801, 4802, 4803, 5001, 5004, 5007, 5010, 5012, 5136, 5137, 5140, \
5141, 5142, 5143, 5144, 5145, 5376, 5377, 7045, 8003, 8004, 8007, 64004

<Input in>
      Module im_msvistalog
      Query <QueryList>\
                  <Query Id="0">\
                        <Select Path="Security">* </Select>\
                        <Select Path="Application">* </Select>\
                        <Select Path="Setup">* </Select>\
                        <Select Path="System">* </Select>\
                  </Query>\
            </QueryList>
            <Exec>
                  if ($EventID NOT IN (%aisiem%)) drop();
            </Exec>
</Input>

<Input Apache_In>
	Module im_file
	File "C:\Program Files\Apache Software Foundation\Tomcat 9.0_Tomcat9.0\localhost_access_log.*"
	SavePos TRUE
	InputType LineBased
	Exec if $raw_event =~ /^#/ drop();
	Exec $Message = $raw_event;
</Input>

<Output out>
  Module om_udp
  Host 10.0.0.1
  Port 5154
  Exec to_json();
</Output>

<Output Apache_Out>
	Module om_udp
	Host 10.0.0.1
	Port 514
	Exec $SyslogFacilityValue = 2;
	Exec $SourceName = 'apache-access';
	Exec to_syslog_bsd();
</Output>

<Route 1>
  Path in => out
</Route>

<Route Apache_Out>
	Path Apache_In => Apache_Out
</Route>
Restart NxLog services
Step 1: Restart NxLog from Services or use elevated Command Prompt:
net stop nxlog
net start nxlog
Change Audit Policies
Search for "Local Policies" in the Windows search box
Navigate to Local Policies → Audit Policies
- For each of the 9 audit policies:
Click on Success and Failure checkboxes
Click Apply → OK
Repeat for all policies
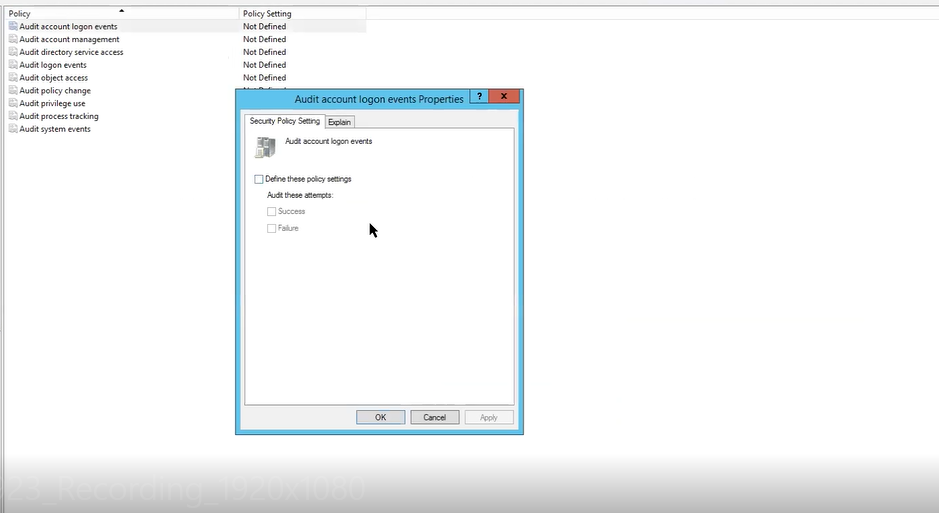 Repeat this for all 9 policies one by one.
Update Group policy
Step 1: Open Command Prompt as Administrator
Step 2: Run the following command to validate enabled policies:
gpresult /r
Verification (MSSP Only)
Using the UI
Login to ADR UI → SYSTEM → LOGS AND FLOWS COLLECTION STATUS
Check for last 30 minutes.
Inside SOURCE DEVICE IP, the server IP will be reflected.
Troubleshooting
If data is not reflecting on CCE:
Step 1: Navigate to
C:\Program Files\nxlog\data\Step 2: Open
nxlog.logfile in NotepadStep 3: Check which error is showing and on which line number
Step 4: Verify the
.conffile configuration on that particular line:C:\Program Files\nxlog\conf\nxlog.conf
Was this article helpful?
That’s Great!
Thank you for your feedback
Sorry! We couldn't be helpful
Thank you for your feedback
Feedback sent
We appreciate your effort and will try to fix the article